Showing posts with label tutorial. Show all posts

Monday, July 14, 2025

BeyondPod Migration despite BeyondPod being gone.

Some of you - like me - have probably relied on BeyondPod for years to get your daily dose of podcasts. It was, and arguably still is, one of the best podcast managers out there -  or I’m just too used to it to change my podcast player.

However, it has need not updated or maintained for quite a while. And when I just finished setting up my new device (OnePlus 13), I was quite surprised not to find it installed after all (almost all) other apps went through.

Quick check to verify: Indeed, no longer available in the play store


So, side loading from the old phone it is then.


I'm going to walk you through a simple, effective method to clone your existing BeyondPod installation from one Android device to another, ensuring you don't lose your meticulously curated podcast library and settings. We'll be leveraging the power of Google Files (or a similar file manager) to make this happen.


What you'll need:

  • Your old Android device with BeyondPod installed.
  • Your new Android device - duh.
  • Google Files installed on both of them.


But first:

Backup BeyondPod's Settings and Subscriptions using BeyondPod itself on the old device (not going to walk you through). And then move the backup file to a location that you can access from the new phone (or quick-share it over).


Find the APK files:

Open Google Files (or your preferred file manager, but I absolutely recommend Google Files here).

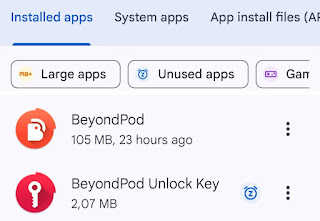
There go to the Apps category


There, find BeyondPod and BeyondPod Unlock Key entries.

Best sort the list by app name, before you scroll through the whole list... so both will be next to each other and rather at the begin of the list, them starting with "B".


Now lets transfer the Files to Your New Device:

Open Google Files on your old device. Navigate to where you saved:

  • The "BeyondPod.bak" backup file.
  • The "BeyondPod.apk" file.
  • The "BeyondPod Unlock Key.apk" file (if applicable).

You can select these files and use the "Share" option within Google Files. The easiest way to transfer them to your new device is often via "Share Nearby" or QuickShare (if both devices are close and have it enabled), or by uploading them to a cloud service like Google Drive, Dropbox, or even emailing them to yourself.


Once transferred, download these three files to your new device, preferably into your "Downloads" folder for easy access.


Prepare Your New Device for Installation:

On your new device, before installing anything, you'll need to allow installations from unknown sources. This setting's exact location can vary slightly between Android versions, but it's usually found under "Settings" > "Apps & notifications" > "Special app access" > "Install unknown apps" (or similar).  Or just open "Settings" and search for “Installation Sources”

You'll need to grant permission to the file manager app (like Google Files) that you'll use to open the APKs.

If you omit this step, Android might ask you during installation later. But if installation does not work then, go back to this step and make sure app installation is allowed from your file manager.


Install BeyondPod on Your New Device:

Using Google Files on your new device, navigate to the "Downloads" folder (or wherever you saved the transferred files).

  • First, tap on the “BeyondPod.apk” file and select "Install." You might get a warning about installing from an unknown source; confirm that you want to proceed.
  • Next, if you have a separate "BeyondPod Unlock Key.apk”, install that one as well.


And finally restore BeyondPod’ settings:

Open BeyondPod on your new device. It might start with no feeds, and that's perfectly fine. Now, go to "Settings" > "Backup and Restore" > "Restore". Browse to the location where you saved the BeyondPod ".bak" file (e.g., your "Downloads" folder) and select the latest backup. BeyondPod will import your subscriptions and settings.


And that’s it.


Sunday, December 28, 2014

How to Backup a Broken Nexus 5 via USB

So, the other day I decided to drop my beloved Nexus 5 - display first - on a concrete (or stone, whatever) floor, right in the middle of Vienna's most busy shopping street. And got a result like this:

Not only was the glass broken, but the display itself was defect in large areas as well. Touch of course did not longer work.

I visited a repair shop just down the road, and guess what, they only have Samsung and Apple spares on stock, and I got the tip to use a cover next time. Yeah right, Thanks a lot.
So with the broken display and all, I decided to purchase a new one (via Play store), which is en-route to Vienna right now.

In the meantime I was trying to save whatever I can from the old device. My Nexus is unrooted without even a hint of Titanium Backup or the likes activated. Luckily I enabled the developer options as a first step after I got it.
So I connected it via USB to my PC and saved whatever as accessible this way.

I have the Android Developer Kit / SDK Tools installed on my PC, so I have adb at hand - the Android Debug Bridge, which is needed for the following steps.

Then I tried an "adb backup", which prompted for a confirmation on my device.
Of course, with no touch and the broken display I could not enter one.

So, the ultimate hack of 2014 to the rescue:

Step 1.
Connect a USB mouse via USB converted to the phone.
Yes, I really wrote that. A regular (PC) USB mouse. And you'll also see a regular mouse pointer on the display then. How cool is that.


Unlock the phone by drawing the swipe pattern with the mouse.

Then immediately (with the mouse again), go to settings and change the pattern to a PIN.

The PIN can be easily sent via USB from the PC, the pattern less so. Now we can disconnect the mouse again.

Step 2.
Connect the phone to the PC again.

Run "adb devices" just to be sure you are connected (all adb commands are of course from the windows command line or whatever your "host" operating system is).

If you are stuck with the lock screen, you need to swipe up with the following adb command[1]:
adb shell input swipe 500 1900 500 900

Then you should get the PIN prompt.

Unlock it with a sequence like this:
adb shell input text 1234 
adb shell input keyevent 66

The first line sends the PIN (1234 in this example), the second line sends the ENTER after it.  The event codes can be found in the Android Developer docs or here. The POWER, ENTER, BACK and HOME keys/events are quite useful :)

Step 3.
Start the backup with
adb backup  -apk -obb -shared -system -all

(or whatever options you require)
Then you'll get the full backup confirmation prompt, which needs to be answered again with the help of  adb shell input commands.
You can set a password with
adb shell input text password  [2].

However, it does not accept the keyevent 66 to confirm this dialog; this literally inserts a new line at the end of the password.
We have to tap on the "BACK UP MY DATA" button at the right bottom of the screen. Which leads us to

Step 4.
Luckily you can also emulate touch events via USB. Some research, some guessing, and trial and error showed, that this button is roughly in the area of coordinates 800,1750   (so in the right third and just above the button bar). The display is 1080x1920 in size, so that was easy to guess and test.
So we send a
adb shell input tap 800 1750

And the backup starts.
Magic.

Tomorrow I shall hopefully receive my new Nexus 5 (if the UPS guy for once delivers on the first attempt) and then I can report on how the migration to the new device works.

--

[1] The screen is 1080x1920; so the start position for our swipe is 500/1900 , i.e. quite in the middle, almost on the bottom, the end is 500/900, i.e. quite in the middle, quite in the middle, and almost perfect swipe to unlock.
[2] substitute your real desired password for password here, right after text.

Monday, February 07, 2011

Sharing Thunderbird Address Books... some experience

This is a follow up to my post on Sharing Thunderbird Address Books Between Computers with Dropbox.
I've been using this for 3+ weeks now, and here's the experience.

Overall it works quite well, however:
  1. I noticed 2 occasions where the filesystem link from the address-book in the Thunderbird profile to the one in the "My Dropbox" folder got lost. The abook.mab in the profile folder then all of a sudden is a real file with not connection whatsoever to the dropbox file.
  2. Dropbox deteced one replication error and marked it accordingly, by renaming the "older" file as "abook (computername's conflicted copy date).mab"

In both cases replication of the file to and from other computers then fails.
The latter is easy to avoid - at least in my case: Don't have Thunderbird open at the same time on both computers.

Sometimes however, this is tricky, because you need Dropbox to replicate the file before you start Thunderbird on the other computer. So e.g. when you hibernate one PC whilst Thunderbird is still running (keeping the abook.mab file open and locked), the file will not get uploaded to Dropbox. When you then start Thunderbird on the second computer and modify the address-book... voila... replication conflict.

I still don't know what caused the link failure from problem #1. Will continue to monitor this.

Sunday, January 16, 2011

Sharing Thunderbird Address Books Between Computers with Dropbox

In the previous post I described how to synchronize your Thunderbird signature (file) across computers using Dropbox.

This was a fairly easy task, because Thunderbird let's you specify the signature file as an absolute path, so you can put your signature anywhere on your computer.
For whatever reasons, the address book has to reside in your profile folder.
So if you want to synchronize Thunderbird address books across computers using Dropbox, this is a bit more tricky.

First, we have to somehow have the address book file in the "My Dropbox" folder, and still in the profile folder.
Luckily, Windows XP (and later) do have links in the NTFS filesystem - contrary to what most people think/know.
Technically they are called NTFS junction points, but usually referred to as links.
You can create them with the FSUTIL utility.

So what we'll do is.
  1. Find the "master" address book
  2. move it to the Dropbox folder
  3. replace the original file in the profile folder with a link to the file in the Dropbox folder
  4. repeat step 3 for all computer.
So, assuming you already did register for Dropbox and install it, here are the details:
    1. In Thunderbird check the name of he address book you want to synchronize. In the Address Book window, select the address book of your choice and then properties. The only property there is the name.
    2. In the Config Editor, locate the file name for your address book. This can easily be done if you filter the view on "ldap_v2.servers.*.descr". This will list all the address book names you have, including the one we are looking for (from step #1).
    3. Find the id of your address book.
      It is is right behind "ldap_2.servers.".  Something like "pab" or "default".
    4. Once you have that identifier, you can get the file name from "ldap_2.servers.yourid.filename". It is most likely abook.mab. [1]
    5. Then locate your Thunderbird profile folder.
      This is (as a default) in the Thunderbird folder of your personal Application Data directory. The fastest way to get there is via Windows Start MenuRun → "%appdata%" (literally with the percent signs). Then go to Thunderbird, then Profiles and then pick the profile you want to modify (if you have more than one).
    6. Now find the file from step #4.
    7. Be sure to exit Thunderbird now, so that all files are closed and available to you.
    8. Move the file from step #6 to your "My Dropbox" folder (again, this can be easily opened by double clicking on your Dropbox icon in the task bar).
    9. Open a command line (StartRun → "cmd.exe" ) and change directory to your profile folder form step #5.
    10. Find the "My Dropbox" folder in your file system. It's quite close to the Application Data folder. Try something like a "dir %homepath%\abook.mab /S /B" to find the exact location of the file.
    11. Create the symbolic link with the following command:
      fsutil hardlink create abook.mab "..\..\..\..\My Documents\My Dropbox\abook.mab"
      Before you do this, you might want to check with dir, if the abook.mab file can really be found with the above path. Correct your path as appropriate. You can also use the absolute path from step #10.
    12. With a "dir abook.mab" verify that the "logical" file is back again with the correct size.
    13. Start Thunderbird and verify that your address book is available and correct.
    14. Go to computer #2 
    15. Repeat steps #1-12 as above, just do not copy the abook.mab (or whatever the name is) to the Dropbox folder. Only delete (or rename) it in the profile folder, before your create the link with fsutil.
    16. When you start Thunderbird you should now have all the addresses from computer #1 available.
    17. Repeat #15 for all remaining computers

    ONE BIG CAVEAT:
    I haven't been using this method for long, so I can't really say how stable this works, especially if there are "replication conflicts", i.e. when you update the file on both computers before Dropbox has a chance to synchronize. Should there arise major problems with my setup, I'll post them here.

    Comments section is of course open for your findings.

    --
    [1] in the following paragraphs I will - for brevity - only call it abook.mab; please substitute your file name as appropriate.