As noted a couple of days ago, I broke my Nexus 5 and managed to get a backup via adb.
Finally, UPS managed - as usual with their second attempt and one call in between - to deliver the new Nexus 5 yesterday.
So, unbox, switch on, log into Wifi, etc etc... and have the system update to 4.4.3.
What?!?
Say Again!
"... and have the system update to 4.4.3."
No matter how often I repeat this, it's still weird that a brand new Nexus 5, ordered and shipped directly from Google, comes with 4.4.2 the end of 2014.
Anyway, update to 4.4.3, reboot, update to 4.4.4, reboot, update to 5.0....
Nope.
No 5.0. No Lollipop. As we know, rechecking every 5 seconds for an Android over-the-air update is as useful as hitting the elevator call button 10 times.
Well, so enable developer options with the 7x tap on the Build Number. Enable USB debugging.
Connect to PC, authorize, find the device with "adb devices". Voila.
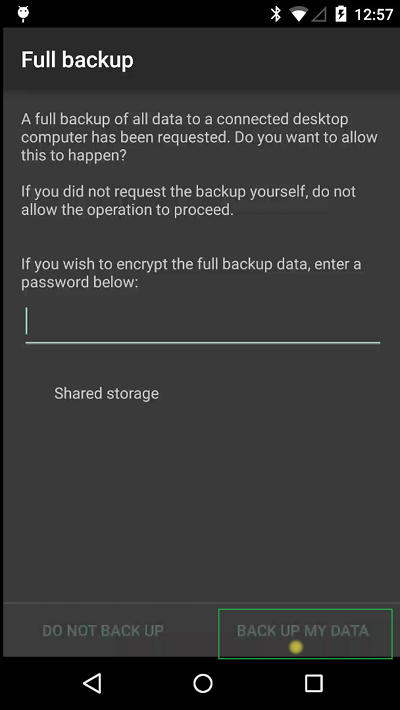
Let's try the "adb restore". Enter the password on the mobile, this time without the help of the "adb shell input" workaround. The restore starts, and ends without any further message after about 2-3 seconds.
Not good.
Lets check the log with "adb logcat". There's something about mismatched header versions, so lets google this.
Well, as can be expected you cannot restore a 5.x backup to a 4.x device.
How silly of me to even consider it.
Recheck the over-the-air upgrade.
Nope, still not 5.0.
So screw it, download the factory image for 5.0.1.
Unlock bootloader, apply image, as described.
Reboot, log into Wifi, ...
Then the new Lollipop Setup Assistant kicks in and allows me to actually place my old phone to he back of the new one to NFC pair them, and transfer the basic settings (mainly account and Google settings) directly.
So I plug in the USB mouse again to the old, broken Nexus 5, and try to find the NFC settings (which are of course in the broken part of the display). Google around a bit to find there in the settings they are, and manage to half blindly enable NFC.
A couple of seconds later I have my account and (Google) launcher settings on the new Nexus 5.
Nice.
A lot of the app icons on the home screen are marked to show that the app itself is (still) missing behind the icon.
So I tried to restore the backup.
Again enable developer options (I just loaded a new system image, so everything I did an hour ago was of course gone) and USB debugging (and sideloading).
And now the "adb restore" really did work. Since there is no proper status on the device itself, I started a "adb shell logcat -s BackupManagerService" in another window to see some progress.
And about half an hour later I was done.
Most apps had their settings again, but not all.
Considering what last-resort hack this was, pretty good.
Considering how easy it is, to upgrade from one iPad to the next (via iTunes) this was pretty ugly.
By the way:
The Setup Assistant from Lollipop now supports a lot of options, even restoring data from a previous backup.
But I was not really inclined to test this right now.
If someone wants to sponsor yet another Nexus device for me, I'd be happy to test this for you.
Finally, UPS managed - as usual with their second attempt and one call in between - to deliver the new Nexus 5 yesterday.
So, unbox, switch on, log into Wifi, etc etc... and have the system update to 4.4.3.
What?!?
Say Again!
"... and have the system update to 4.4.3."
No matter how often I repeat this, it's still weird that a brand new Nexus 5, ordered and shipped directly from Google, comes with 4.4.2 the end of 2014.
Anyway, update to 4.4.3, reboot, update to 4.4.4, reboot, update to 5.0....
Nope.
No 5.0. No Lollipop. As we know, rechecking every 5 seconds for an Android over-the-air update is as useful as hitting the elevator call button 10 times.
Well, so enable developer options with the 7x tap on the Build Number. Enable USB debugging.
Connect to PC, authorize, find the device with "adb devices". Voila.
Let's try the "adb restore". Enter the password on the mobile, this time without the help of the "adb shell input" workaround. The restore starts, and ends without any further message after about 2-3 seconds.
Not good.
Lets check the log with "adb logcat". There's something about mismatched header versions, so lets google this.
Well, as can be expected you cannot restore a 5.x backup to a 4.x device.
How silly of me to even consider it.
Recheck the over-the-air upgrade.
Nope, still not 5.0.
So screw it, download the factory image for 5.0.1.
Unlock bootloader, apply image, as described.
Reboot, log into Wifi, ...
Then the new Lollipop Setup Assistant kicks in and allows me to actually place my old phone to he back of the new one to NFC pair them, and transfer the basic settings (mainly account and Google settings) directly.
So I plug in the USB mouse again to the old, broken Nexus 5, and try to find the NFC settings (which are of course in the broken part of the display). Google around a bit to find there in the settings they are, and manage to half blindly enable NFC.
A couple of seconds later I have my account and (Google) launcher settings on the new Nexus 5.
Nice.
A lot of the app icons on the home screen are marked to show that the app itself is (still) missing behind the icon.
So I tried to restore the backup.
Again enable developer options (I just loaded a new system image, so everything I did an hour ago was of course gone) and USB debugging (and sideloading).
And now the "adb restore" really did work. Since there is no proper status on the device itself, I started a "adb shell logcat -s BackupManagerService" in another window to see some progress.
And about half an hour later I was done.
Most apps had their settings again, but not all.
Considering what last-resort hack this was, pretty good.
Considering how easy it is, to upgrade from one iPad to the next (via iTunes) this was pretty ugly.
By the way:
The Setup Assistant from Lollipop now supports a lot of options, even restoring data from a previous backup.
But I was not really inclined to test this right now.
If someone wants to sponsor yet another Nexus device for me, I'd be happy to test this for you.