 So, the other day I decided to drop my beloved Nexus 5 - display first - on a concrete (or stone, whatever) floor, right in the middle of Vienna's most busy shopping street. And got a result like this:
Not only was the glass broken, but the display itself was defect in large areas as well. Touch of course did not longer work.
I visited a repair shop just down the road, and guess what, they only have Samsung and Apple spares on stock, and I got the tip to use a cover next time. Yeah right, Thanks a lot.
So with the broken display and all, I decided to purchase a new one (via Play store), which is en-route to Vienna right now.
In the meantime I was trying to save whatever I can from the old device. My Nexus is unrooted without even a hint of Titanium Backup or the likes activated. Luckily I enabled the developer options as a first step after I got it.
So I connected it via USB to my PC and saved whatever as accessible this way.
I have the Android Developer Kit / SDK Tools installed on my PC, so I have adb at hand - the Android Debug Bridge, which is needed for the following steps.
Then I tried an "adb backup", which prompted for a confirmation on my device.
Of course, with no touch and the broken display I could not enter one.
So, the ultimate hack of 2014 to the rescue:
Step 1.
Connect a USB mouse via USB converted to the phone.
Yes, I really wrote that. A regular (PC) USB mouse. And you'll also see a regular mouse pointer on the display then. How cool is that.

Unlock the phone by drawing the swipe pattern with the mouse.
Then immediately (with the mouse again), go to settings and change the pattern to a PIN.
The PIN can be easily sent via USB from the PC, the pattern less so. Now we can disconnect the mouse again.
Step 2.
Connect the phone to the PC again.
Run "adb devices" just to be sure you are connected (all adb commands are of course from the windows command line or whatever your "host" operating system is).
If you are stuck with the lock screen, you need to swipe up with the following adb command[1]:
adb shell input swipe 500 1900 500 900
Then you should get the PIN prompt.
Unlock it with a sequence like this:
adb shell input text 1234
adb shell input keyevent 66
The first line sends the PIN (1234 in this example), the second line sends the ENTER after it. The event codes can be found in the Android Developer docs or here. The POWER, ENTER, BACK and HOME keys/events are quite useful :)
Step 3.
Start the backup with
adb backup -apk -obb -shared -system -all
 (or whatever options you require)
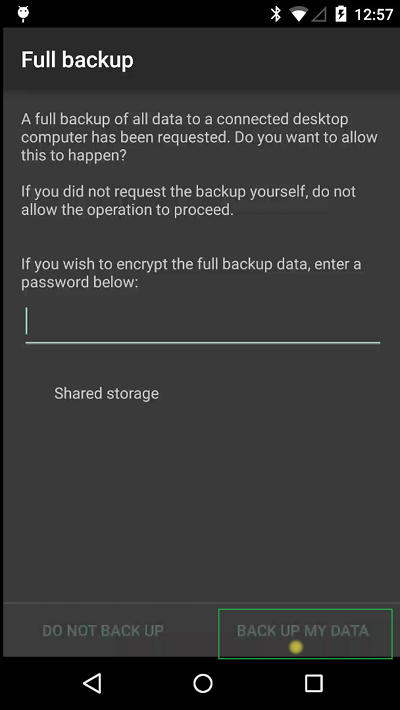
Then you'll get the full backup confirmation prompt, which needs to be answered again with the help of adb shell input commands.
You can set a password with
adb shell input text password [2].
However, it does not accept the keyevent 66 to confirm this dialog; this literally inserts a new line at the end of the password.
We have to tap on the "BACK UP MY DATA" button at the right bottom of the screen. Which leads us to
Step 4.
Luckily you can also emulate touch events via USB. Some research, some guessing, and trial and error showed, that this button is roughly in the area of coordinates 800,1750 (so in the right third and just above the button bar). The display is 1080x1920 in size, so that was easy to guess and test.
So we send a
adb shell input tap 800 1750
And the backup starts.
Magic.
Tomorrow I shall hopefully receive my new Nexus 5 (if the UPS guy for once delivers on the first attempt) and then I can report on how the migration to the new device works.
--
[1] The screen is 1080x1920; so the start position for our swipe is 500/1900 , i.e. quite in the middle, almost on the bottom, the end is 500/900, i.e. quite in the middle, quite in the middle, and almost perfect swipe to unlock.
[2] substitute your real desired password for password here, right after text.
3 comments:
That is useful. Very. Thanks for sharing!
Unfortunetly i dont have a converter nor a mouse and i have a mac:(
unfortunely i dont have a mouse or a converter and i have a mac
Post a Comment