Showing posts with label tip. Show all posts

Saturday, January 03, 2026

Bad Ideas with Obfuscation

All my release versions of my Android apps are obfuscated with Proguard - which us quite usual.

However, it is a bad idea in some circumstances:

When you rely on reflection.

Sounds rather obvious, but sometimes you "dont know" this happens. Like when you serialize and deserialize JSON/XML data ("Rest") via Jackson
It is obvious, isn't it, but a couple of years ago it took me ages to find.

When you rely on class names.

Also rather obvious. What I did was have a listener class that will be asked if it wants to receive certain updates, and one of the parameters was the Class data that changed. Think of it like "Do you want to know if any of those Favorites changes?" and passing the "Favorite" class as a parameter,.
The listener has a 
public boolean wantsUpdatesFor(Class<?> clazz)
{
return Favorite.class.equals(clazz);
}
Worked fine in debug, didn't work in release. The main difference was of course obfuscation.
I removed it for those classes (or rather the whole package of them) et voilĂ  worked again

Conclusion

If you find something works fine in debug but not at all in release, it's not always the emulator or its Android version or something like that, look at obfuscation was well and maybe remove it for a quick test.
(Or create a no-obfuscation build variant for that).

Monday, July 14, 2025

BeyondPod Migration despite BeyondPod being gone.

Some of you - like me - have probably relied on BeyondPod for years to get your daily dose of podcasts. It was, and arguably still is, one of the best podcast managers out there -  or I’m just too used to it to change my podcast player.

However, it has need not updated or maintained for quite a while. And when I just finished setting up my new device (OnePlus 13), I was quite surprised not to find it installed after all (almost all) other apps went through.

Quick check to verify: Indeed, no longer available in the play store


So, side loading from the old phone it is then.


I'm going to walk you through a simple, effective method to clone your existing BeyondPod installation from one Android device to another, ensuring you don't lose your meticulously curated podcast library and settings. We'll be leveraging the power of Google Files (or a similar file manager) to make this happen.


What you'll need:

  • Your old Android device with BeyondPod installed.
  • Your new Android device - duh.
  • Google Files installed on both of them.


But first:

Backup BeyondPod's Settings and Subscriptions using BeyondPod itself on the old device (not going to walk you through). And then move the backup file to a location that you can access from the new phone (or quick-share it over).


Find the APK files:

Open Google Files (or your preferred file manager, but I absolutely recommend Google Files here).

There go to the Apps category


There, find BeyondPod and BeyondPod Unlock Key entries.

Best sort the list by app name, before you scroll through the whole list... so both will be next to each other and rather at the begin of the list, them starting with "B".


Now lets transfer the Files to Your New Device:
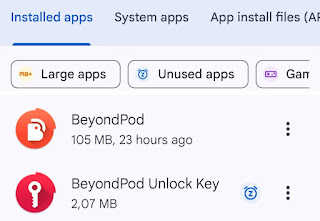
Open Google Files on your old device. Navigate to where you saved:

  • The "BeyondPod.bak" backup file.
  • The "BeyondPod.apk" file.
  • The "BeyondPod Unlock Key.apk" file (if applicable).

You can select these files and use the "Share" option within Google Files. The easiest way to transfer them to your new device is often via "Share Nearby" or QuickShare (if both devices are close and have it enabled), or by uploading them to a cloud service like Google Drive, Dropbox, or even emailing them to yourself.


Once transferred, download these three files to your new device, preferably into your "Downloads" folder for easy access.


Prepare Your New Device for Installation:

On your new device, before installing anything, you'll need to allow installations from unknown sources. This setting's exact location can vary slightly between Android versions, but it's usually found under "Settings" > "Apps & notifications" > "Special app access" > "Install unknown apps" (or similar).  Or just open "Settings" and search for “Installation Sources”

You'll need to grant permission to the file manager app (like Google Files) that you'll use to open the APKs.

If you omit this step, Android might ask you during installation later. But if installation does not work then, go back to this step and make sure app installation is allowed from your file manager.


Install BeyondPod on Your New Device:

Using Google Files on your new device, navigate to the "Downloads" folder (or wherever you saved the transferred files).

  • First, tap on the “BeyondPod.apk” file and select "Install." You might get a warning about installing from an unknown source; confirm that you want to proceed.
  • Next, if you have a separate "BeyondPod Unlock Key.apk”, install that one as well.


And finally restore BeyondPod’ settings:

Open BeyondPod on your new device. It might start with no feeds, and that's perfectly fine. Now, go to "Settings" > "Backup and Restore" > "Restore". Browse to the location where you saved the BeyondPod ".bak" file (e.g., your "Downloads" folder) and select the latest backup. BeyondPod will import your subscriptions and settings.


And that’s it.


Sunday, June 09, 2024

Select URLs in PuTTY

It annoyed me for ages that you cannot just double-click on an URL in Putty to open that URL in your browser. Even selecting an URL for copy/paste is cumbersome.

Yesterday I found the next best thing: Select URLs in PuTTY

In essence you tell putty which characters form "words" and which are stop-characters. More here.

So on the "Window > Selection > Copy" tab, if you add :?= and some other URL characters to class 2, can at least can double click on an URL to select the full URL.


Don't forget to save those settings to your configuration(s).


Saturday, May 09, 2020

Windows 10 Folder Shortcuts

I have to admit, I did not know about that:

The shell: command can be used to open a special folder directly from the Start, Search menu or from the Run dialog. For example, the command shell:sendto opens the SendTo folder (%userprofile%\sendto) of your user profile. To launch the Documents folder of your user profile, you’d type shell:Personal. Below is a complete shell: commands listing for Windows 10/8/7/XP/Vista. The entire listing is stored in the following registry key in Windows Vista and higher:
HKEY_LOCAL_MACHINE\SOFTWARE\Microsoft\Windows\CurrentVersion\explorer\FolderDescriptions
So e.g. Windows-R and "shell:startup" opens the startup folder.
I used to play around with "%appdata%" etc etc where I knew there was an environment variable for it, but the shell: shortcut enables a lot more.

Found - amongst others - here 
and of course on superuser.com

Sunday, September 13, 2015

How to hide a userid from Windows login screen

With DB2 on my home PC[1] I have a service account for the DB2 instance, makes life a lot easier than trying to map it to you actual user(s).

However, regular Windows (Home) setup has 2 defaults that are annoying:
a. password and account expiry for this user.
b. the userid appears on the Windows login/lock screen, although nobody is supposed to sign in with it.

Create a maintenance free user
The first issue I fixed a couple of month ago, because that was really annoying. Because DB2 just would not start. And the first two times this happened I had to work through db2diag.log to find out what happened.
So, make sure the account actually never expires (that's separate from the password). With admin privileges run
  net user db2admin [2]
to check if the user account expires.
If it does, then run a
  net user db2admin /expires:never
to fix this.

The password expiration is trickier, since it cannot be done with the net user command.
To make the password everlasting, run
  WMIC USERACCOUNT WHERE "Name='db2admin'" SET PasswordExpires=FALSE

I found this thanks to the folks at StackExchange.

Hide the service account from the login screen
I wanted to do this on Windows 7 already, but never found the time or cared enough. Now with the move to Window 10 I thought of it again and fixed it.
So this can be done with group policies and stuff, but not on a standalone Windows Home edition.

Registry and Microsoft Technet to the rescue:

Create an entry under
  HKEY_LOCAL_MACHINE\SOFTWARE\Microsoft\Windows NT\CurrentVersion\Winlogon\SpecialAccounts\UserList and list the db2admin user with a dword (32) of 0 to hide it. Remove the entry or set it to 1 to show the user again.

VoilĂ .

--
[1] Ha, now that I no longer work for Oracle, I can again freely admit it... Not that I really held back on this in the past 5 years.
[2] replace db2admin with the userid you need this for

Saturday, May 23, 2015

FlickrTab for Chrome

How about an extension for the Chrome Browser that does nothing for your productivity, almost the opposite: Flickr Tab


All it does: it will show a photo from flickr every-time you open a new (empty) tab on Chrome. That's it.
No productivity value at all. But you get to see truly awesome pictures.
I installed it a couple of weeks ago when it first was released, and enjoyed it ever since.

Saturday, March 15, 2014

Google Timer

Just discovered this:
Enter timer in the Google search or awesome bar of your favorite browser, and Google will present you a nice little timer app/widget.

Just then enter whatever time you want/need and start.

You can also go fullscreen, e.g. if you need to project this during presentations or so.

Cool thing is, wherever you have google, you have this timer.

There are some nice short cuts, try them:
timer 10 minutes
timer 16:30
timer 5:30 pm

Sunday, October 20, 2013

Screenshots with Dropbox

A couple of weeks ago, Dropbox (my favourite cloud storage or rather information sharing tool) started to support putting Screenshots directly to your Dropbox folder (for Windows and Mac).

Make sure you have Verison 2.4 (or later) installed (get it here), then open preferences and enable Share screenshots using Dropbox on the Import pane.

From then on, when you press the Print Screen button, Dropbox will save the screenshot to a (new) folder in your Dropbox named Screenshots.

Alternativeley when you hit Ctrl Print Screen it will save the screenshot and copy a public web link (URL) pointing to the screenshot to your clipboard. You can immediately paste this into the browser, or an email, or skype, or whatever you want to use to share this screenshot with friends or coworkers.

You will then see a notification on your Dropbox taskbar icon, once the screenshot is saved (and ready for sharing).

By the way,  those screenshots where taken with Dropbox (as descripbed above) and then edited with Gimp.

Thursday, May 09, 2013

Syncing Google Contacts to iPad/iPhone Address Book via CardDAV

The cloudier software and services get, the less I sync my iPad with iTunes.
It took Apple a while, but even podcasts can now be sync'd over the air without iTunes.

The only thing that I really needed to go through iTunes was syncing my iPad address book with Google Contacts (in GMail). I only synced about once a month (probably even less often) so my address book really missed some contacts.

But now that we have 2013 Apple and Google both support CardDAV - if you will, the address book equivalent of the more popular CalDAV (for calendar data).

With CardDAV the iPad (or iPhone for that matter) directly goes to Google without the detour through iTunes on the PC. The benefit: you'll be really in sync, like on Android. (SCNR)

Here's what you need to do:

Create a new Account with CardDAV

In Settings find the Mail, Concacts, Calender bullet; the first section is the Accounts section, and there click on Add Account.... Create a new Other account and then select Add CardDAV Accont in the Contacts section.


All you need to provide then is google.com for the server, and your Google credentials (userid and password). You can of course modify the description, but the default - taken from the server name - google.com sounds quite apt, doesn't it.

That's it.
Really.


Unless...

... you did sync your Google contacts previously through iTunes - like I did.

Because then you will notice - in the contacts app - that now all entries are duplicate. Once from the new CardDAV account, and once from the iTunes sync.

Let me show you the fastest way to
Delete the old Address Book

Back to the Settings / Mail, ... page.
Create a new Microsoft Exchange account with dummy parameters like test for Email, Username and Password. I used "test" for it.

Then the iPad will prompt you for a server name, say m.google.com, just to have one that really exists and answers.

Next the iPad will ask you for the services on this account, make sure you turn Contacts to ON.
And now the nice part: you will be prompted if you want to delete all your local contacts. Say you do. And confirm. Be sure to save the account settings, because it will only delete when you save.

And now the old local address book will be gone.
Remove the dummy Exchange account you just created.

Now you have all your Google contacts sync'd to the iPad through CardDav... over the air. No iTunes needed.
Don't forget to go to the PC and turn of Contacts sync (to Google) for the iPad as well.

Friday, April 19, 2013

HTC Contacts and Google Maps

I don't like the HTC Locations service on HTC Android phones. And I don't know anyone who does.
I really do prefer Google Maps and Google Navigation.

Bummer is was that when you click/tap on the location of an event in the (HTC) Calendar, it always takes you to "locations" instead of Google Maps.

Turns out, there is an app for that :)
Aptly called Select Other Map for HTC and available in the Play Store.

And it does just that. It is only there to register Google Maps for the same intent/scheme as HTC did with locations.
Once installed, the next time you click on a location in the calender, the Android system will find two apps registered for the same action, and will ask you for your preference.

You can pick Location Picker (which you wont, because that's the whole point) or Select Other Map.


Choose this one and say Always (unless you just want to try this once).
And - voilĂ  - Google Maps will open and search for the location from the event.

You can always change this back, by going to the Select Other Map app in Settings > Apps and click on Clear Defaults in the Select Other Map app.  This will undo the Always selection from above and you are free to go back to the cra**y HTC location picker.

Friday, March 22, 2013

MyScript Calculator for Android

This is a nice little calculator.


Even works fine without a stylus on a smartphone as well...
Get it from the play store here.

Sunday, February 24, 2013

Opening ICS Files with Thunderbird/Lightning

Now as the world is slowly progressing towards the 21st century when it comes to calendaring tools, some websites offer to download a calendar file (ical, ics, ...) for events they publish.

The problem in my environment is, that no application on my (Windows) PC is registered to handle this file type.
Thunderbird/Lightning simply does no do this.

The out-of-the-box solution without any hacking is to simply download the .ics file e.g. to the desktop, and then drag&drop it to Thunderbird's today pane. This triggers an import. Quite OK.

Works with TB17 and Lightning 1.9.
(Sometimes it seems I have to hold the Ctrl key to force a copy (instead of a move)... awkward.

Thursday, August 09, 2012

Data Usage Monitor in Android ICS

Found this while playing around with my HTC One S running Ice Cream Sandwich (aka ICS, aka Android 4.0) while on vacation and roaming (!).

If you pull down the Settings menu or open it via the apps screen under *** more you will find a Usage menu.

Opening this will reveal some very useful and detailed statistics about the data usage of your phone.

You can see the wireless data as it accumulates over the data usage cycle as you define it. Since I am on a corporate plan where the billing cycle starts with the first of the months, I set the usage cycle to the month. If your billing cycle starts on the - say - 21st, you should change this to 21st to 21st of the following month. Set the Reset data count value for this.

You can also set two different thresholds.

  1. A simple warning when a certain data volume is reached within the usage cycle - see the 1.0GB bar in the graphic
  2. A real limit, where - once reached - the phone will no longer allow a data connection. As you can see I have not activated the hard limit.
If you scroll down further, you can see in detail how the data is been use per application. This lets you easily identify data hogs, giving you some good data points when you want to tweak your data consumption.

In my cases here (just for demo) a good idea would be turn of one of the podcast players (I have both, BeyondPod and Google Listen active right now... more on this later), and also restrict them to Wifi only... Or maybe do less Facebook while commuting :)

Very useful indeed. If you are running ICS already, take a look at it.


BTW: You can turn this on for Wifi, too. This will give a separate tab on this page.